Showing posts with label sewing machines. Show all posts

Wednesday, January 4, 2012

happy new year!

My goal for 2012 is to post on the blog more often, and in order to do so I'm going to minimize the "fussiness" of my posts in hopes that I will be able to just post, rather than avoid posting until I have time to do it up "right."  This time never shows up, anyway, oddly enough.

First off, I'm going to highlight two of my Christmas gifts.  I am well loved (or spoiled) and received many more than two, and all of them were awesome and made me very happy, but these are the two that I wanted to share with everyone.

This is Queen Cupernica, a gorgeous handmade bronze and copper dragon that was the final gift to me sent by my Ars Sekrit Santa.  I've taken part in this exchange for five or six years now, and had a great time every year, but this year I was completely blown away by my Santa's efforts.  Not only did he find such a gorgeous dragon to add to my collection, but he put together several different gift packages along with a story explaining her arrival.  My husband was slightly miffed at the amount of effort put forth, as now he had to figure out how to top that!

And the second item is another dragon - this one an Imperial Young Dragon from Windstone.  I've wanted one of this style for years, but they have been out of production since before I started seriously collecting dragons, and the prices on eBay have always been ridiculous.  The company rereleased the design in two new colorways, this gorgeous copper patina as well as an amethyst, and I told my husband about them immediately upon release back in October.  What makes this gift all the more special is that he actually ordered it immediately, a first for him to buy a Christmas gift that far in advance, and even made arrangements so I wouldn't even know it had been purchased until I received it.  So this dragon is more than just another piece in my collection - it is a solid and present symbol of my husband's love for me.  Awww.

Somewhere around December 10th is when I decided that there was no way to finish both of the quilts for my niece and nephew before Christmas, short of taking off work for the last two weeks of the year.  So we moved on and got them some cool toys instead, and the quilts will be their birthday gifts this year.  I've finished about half of the quilting on Averie's quilt, and above is a detail shot showing the quilting in the tower panel at the bottom of the quilt.  I chose to run verticals every third tower, and while they're not all perfectly straight I'm pretty happy with the overall effect.  And as a bonus, the number of towers was evenly divisible by three so I didn't have to do any different-sized intervals.

I've had the first panel of Aidan's quilt set up on the design wall for weeks, and finally pieced it together so that I could (sigh) put it away for a little bit to make a (much smaller) baby quilt for a friend's baby that is due very soon now.  Part of why I hadn't worked on it at all is due to the hassle involved in switching out my main sewing machine from a quilting setup (for Averie's quilt) to a piecing setup (for this one), which I just didn't want to deal with.  I finally bit the bullet and set up my Pfaff 130, and after some fussing with the settings I got a great scant 1/4" seam and was able to put this panel together.  And amazingly, somehow the Pfaff (despite being 60 years old) produced the best patchwork I've made yet - look at how all of the corner points line up in this shot!  And it's that way across the entire panel, I'm just so proud of myself about that!  The final panel size is spot-on as well, so it's not just a consistent seam allowance it's both a consistent and an ACCURATE seam allowance. Wooo!

In December I was enamored of the Sweetwater monthly label crew project, a fabric-covered journal, so I joined the group and also ordered the pattern and the kit.  I picked up a moleskine graph paper notebook to use, and a few days after Christmas I started working on the kit.  My first try didn't turn out as well as I liked, but honestly that's okay as using 2.5" squares made for some pretty patchwork that I didn't really want to cover up with the label.  I did a second version using strips (finally breaking into my prized Northwood metallic batik jelly roll) and a slightly larger size than the pattern called for, and this worked out much better.  This project was also completed on the Pfaff 130.

I did the lining up in border collie fabric, as it makes me so happy every time I see it in my iPad sleeve, and I'm very proud of myself for getting the border collies all facing the same way.  Sadly I scorched the personalized label (the J on the left/top) when ironing it on, so I purposefully scorched my personalized label on the lower right so they would look similar.  The flaps are really a bit too big for this notebook, as I could barely get the notebook inside the cover, so if I make another in the future I will make them a little smaller.  Overall I'm super pleased with the result, and I'm using the notebook to make crafting notes - I hope I will keep it up throughout the year!


The last thing I've made recently is a pillowcase, which I made using a tutorial I found online last night.  It came together very quickly, no more than an hour or so from start to finish, and I'm very pleased with how it turned out.  I made it for a guy friend who is recovering from surgery, and who likes blues, so hopefully this navy and royal blue with gray trim pillowcase will be pleasing!  Again I made this on the Pfaff, and it sewed like a dream - even over the final seam where the trim is, which is 10 layers of cotton fabric!  I was amazed at how easily the machine went right over that with no hiccuping or twisting, and I'm not sure my Janome would have handled it as well.  My learning curve on this item is that I didn't have a quite big enough final seam (which encases the raw ends), so I had some threads from the raw edge sticking out from the outer seam which I had to clip.  I've made note of that and will do it better next time - I was trying to avoid moving my seam guide, and just moving the needle position, but I think to encase it properly I need to do a combination of moving the seam guide and being more careful with my ironing to set it up properly.  At any rate, not bad for my first attempt at enclosed seams and a pillowcase!


I'm pretty proud of my final stats for commuting on my motorcycle in 2011.  Of 221 days that I worked in 2011, I commuted by motorcycle for 211 of them, and the remaining 10 days were all commuted by car/truck due to bad weather (snow, ice, below 25F, or flooding).  That's a percentage of 95.5% of days commuted, or an adjusted percentage of 100% - not bad!  My total mileage for the year was 10,541, with nearly all of that commuting as I did just one or two fun rides over the course of the year.  I am hoping to do more fun rides for the year, especially since my new route to work avoids the SR-520 bridge and as such is a couple of miles shorter, meaning I'll need to do a bit more "fun" riding to make up the difference and continue putting on miles at the rate of 10k per year.

According to my GoodReads account, I read 68 books in 2011.  Since I don't record re-reads or the silly ridiculous fluffy romances that I read, my total is probably closer to 100 since I know I reread about 25 books and read more than 7 romances.  Some of the books that I read last year that made it to my "Favorites" shelf are as follows:
Ready Player One by Ernest Cline
The Hunger Games by Suzanne Collins
The Kitchen Counter Cooking School by Kathleen Flinn
Memories of the Future by Wil Wheaton
Life As We Knew It by Susan Beth Pfeffer
Twilight's Dawn by Anne Bishop
Of course, I read many more books than just these six, but of the books I read last year only nine made it to my favorites shelf, so I'd say these are my highly-recommended reads of the year.  For 2012 I've set my challenge to 60 books (it was set to 50 for 2011), and I've already read two - oddly enough, both about knitting!

And of course, I can't wrap up this post without at least one of the border collies!  We took Ezri along with the rest of our club's fast team up to Canada for a New Years Eve tournament, and we had a ridiculously good time.  Dinner, flyball racing, champagne and dessert, and bungee racing, all with a big bunch of our friends - what could be better!  I decided to celebrate with sparkles, including sparkly bright green eyeliner for me and jewels for Ezri, as shown in this excellent photo by my friend Deborah.  Just a dab of eyelash glue secures the gems safely, and as long as the dog doesn't shake before the glue dries, it'll stay put until you take it off.  While we put gems on all of our racing dogs, Ezri was the one who sat still and let me put about 15 on her, and she loved every moment of it!

Happy New Year!

Saturday, May 14, 2011

sewing room remodel, finished!

Posting more often doesn't seem to be working out the way I intended. Oh well. At least I finally found the charging cables for my cameras, so I was able to get the pictures off of them from finishing up my sewing room remodel. I've been happily working in it for about two months now, so this post is well overdue.

First a single photo of what the room looked like before we began. Plain white walls and blue carpet, same as the living room and hallway in our house. The room is rather small, only 8' x 7.5', and I originally just had a single 8' conference table for both my sewing machine and cutting area. This meant that it wasn't really comfortable to do either, and was really my biggest driver for doing the remodel.


The first thing we did was rip out all of the old carpet, as shown in a post in February. Once that was done we painted the walls - two in a tan and two in a light sage, with the half-wall molding done in a dark green - and installed laminate flooring from IKEA in "dark brown" with floor molding to go along with it.


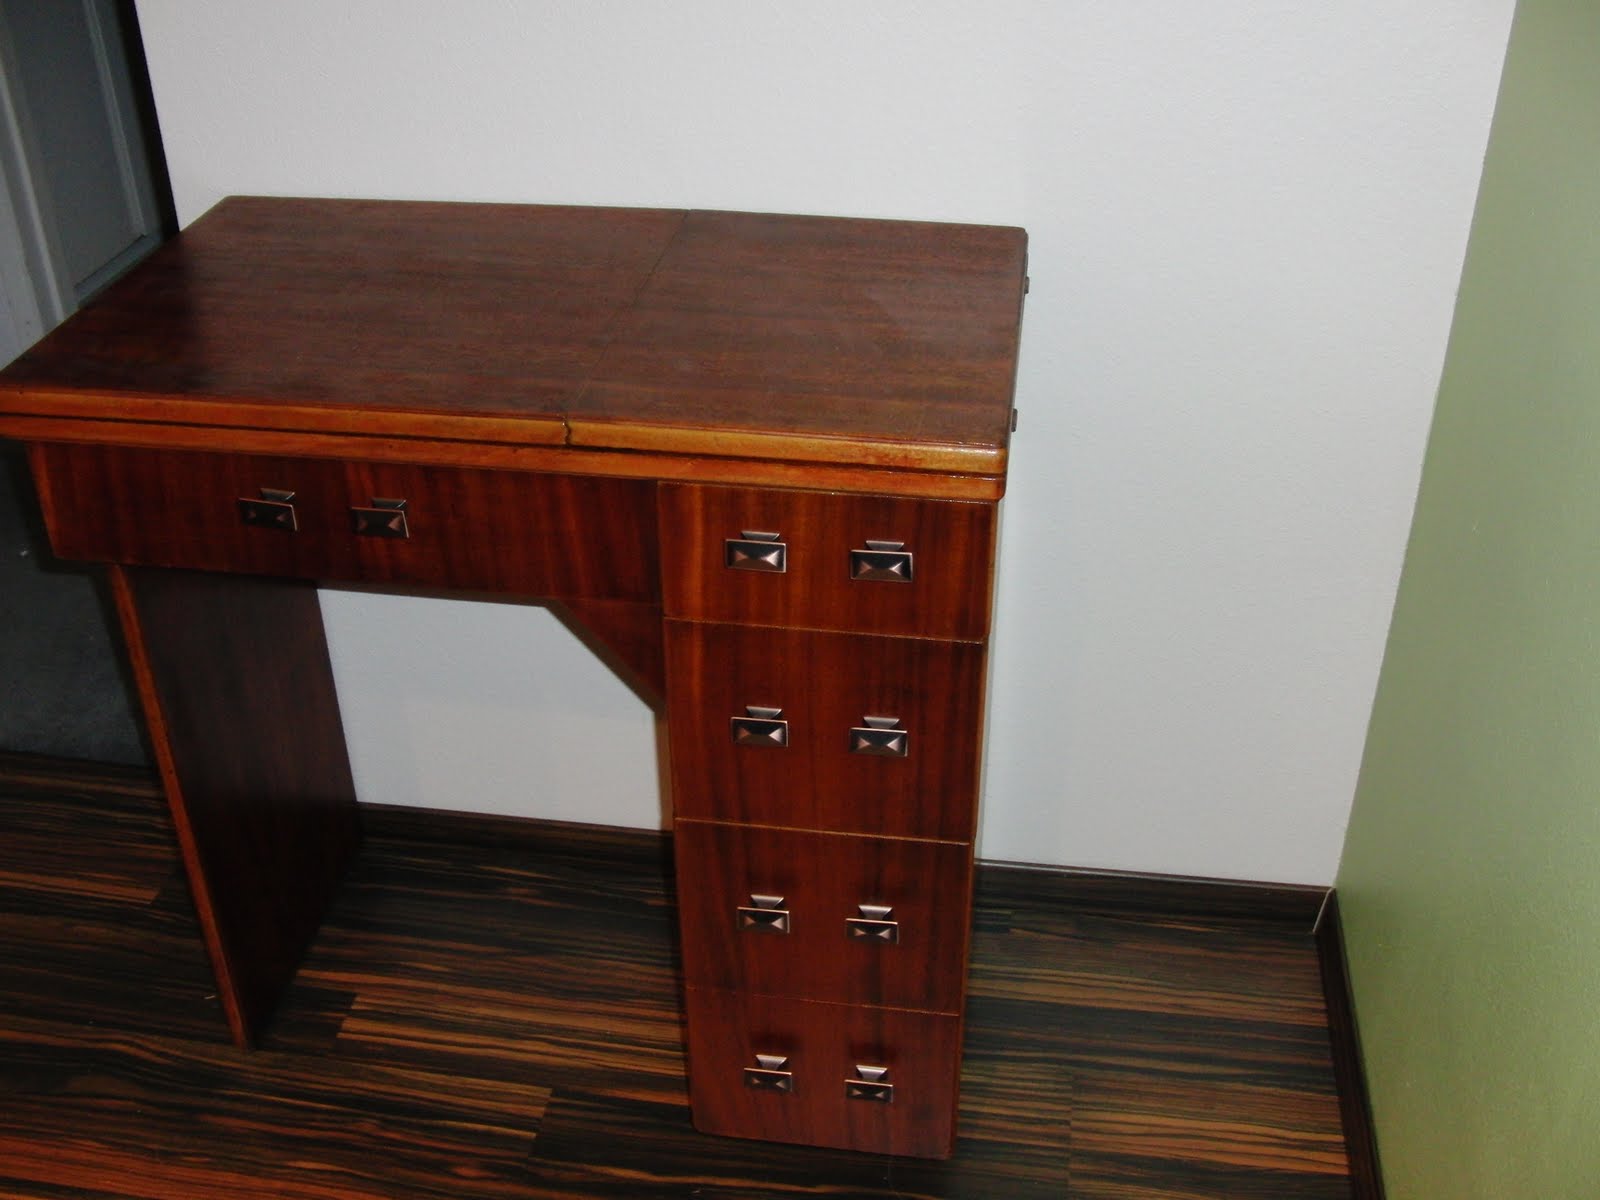
Once that was done, we started moving the furniture back in. Here's the back corner of the room, to the left as you look in the door, showing the cabinet I refinished last year that contains my Pfaff 130 machine.


Next up is my barrister's cabinet, which was given to me by my Nana many years ago when I was still living in Pittsburgh, which holds my fabric stash and some of my other sewing machines. I used fabric and foam board to make panel covers to fill in the glass, which eliminates the visual clutter of the cabinet when the doors are closed. I still need to make a panel for the lower door, unfortunately!


The newest feature of the room was a design wall, where I can put up pieces I'm working on in order to set their design before I sew them together. I made three panels using styrofoam insulation panels from Home Depot, each 2' x 4', covered in batting which was then stapled to the back of the panel. I added picture frame hangers to the back of each panel using superglue to hold them in the styrofoam, then hung them up. They're light and easy to maneuver, and I'm really quite pleased with the result. The picture shows blocks from the Halloween table runner and the baby quilt I made for my friend Kathy, both projects which I'm glad to say I've finished since then!


The replacement for the conference table was two adjustable tables from IKEA, one of which was set up high to use as a cutting table and the other was set down low for my sewing machine. There are plenty of tutorials online and in books about ergonomics of both, but generally you cut material at standing height and want your sewing machine at seated height, so using one table for both really makes it hard for either one to work out. This photo also shows the awesome replacement for nails in the wall - a pegboard, painted dark green to match the half-wall molding trim, which holds my rulers, cutters, scissors, and other tools.


And now, for the photos of my sewing room as it is now with just about everything moved back in (as opposed to the minimalist, neat, and tidy photos above). Here is my sewing table, with the attached ironing board (which Chris cut down for me so it could be used on the low-height table), my bookshelf of sewing books, speakers for use with my iPad (TV or Pandora radio), thread rack, and bulletin board which has a crocheted Star Trek insignia potholder my mother made me, photos of my mom & me, Ezri, and Curzon, a color wheel, and Superior Threads sample cards.


Here's the cutting table photo, where you can see I've added more rulers and tools to the pegboard, and you can see my kaleidoscope quilt blocks on the design wall and my current project on the table. I've also picked up some cheap green and purple small vinyl bins at Target that I'm using for scrap and trash collection on the table - much easier than stepping around the ironing board to the trash can every cut! Beneath the cutting table are my two storage units, mostly for precut scraps and specialty fabrics, which will be joined by a third next time I have a coupon for JoAnn's. Behind the storage units are my wrapping paper supplies, as I figured that was a great place to put them since they're not needed often and my cutting table will be a great place to wrap gifts in the future.


This is another view of the Pfaff cabinet side of the room, also showing my beautiful Brian Froud print and another project that's on the design wall. The cabinet has the awesome Halloween table runner on top of it, but you can't see it right now because it's covered in other fabric acquisitions as well as the working fabric pile for the project on the design wall. To the right is the incredibly cool pirate chest that I got off Craigslist for $30, which is holding my project collections, precut jelly rolls, and unfinished quilt tops. Just ignore the pile of bags under the cabinet...


Above the Pfaff cabinet is the same shelf that was there before, which holds my childhood teddy bear, a unicorn beanie baby my husband gave me, and the beautiful pillow my mother cross-stitched for me for my thirteenth birthday. I'm so lucky to have inspiration from my family and friends in this room when I work.


Finally a view of the barrister's cabinet again, with the doors down to hide the clutter inside them. The clutter isn't actually that bad, since I got some great bins at the Container Store to hold everything (so far), but it's more calming visually to have the doors down. The decorative (but largely useless until I turn it into a hand crank) Singer NL-15 is on top of the cabinet, and my Featherweights, older Janome L-108, and my Rocketeer are inside the cabinet. Just to the left of the cabinet and behind me when I sew is a shower corner shelf kit in the right shade of green that I got for $7 on clearance at Target, which holds my smaller notions that I use often but didn't want right next to my machine. There's also a small whiteboard just to the left of my chair where I note what I'm working on and what's on the list for next.


So there it is - my finished sewing room! I love how it turned out and it makes me happy every time I go in there. There are some features not pictured, like a remote-control power strip for my sewing machine and iron, that I added along the way that are really awesome. I also have a few other things I'd like to hang up in there, like my bridesmaids bouquet from a few years ago that's framed in brown and would look great, and some embroidery hoops that I got to display favorite fabric swatches. Those will get put up eventually...unless we move first!

Tuesday, November 16, 2010

sewing machines, part one

Over the past few years, I've started to quilt and sew, strangely enough. I began with a project that still remains unfinished, namely a queen-sized quilt that I've completed about half of the blocks required for the top. After becoming overwhelmed at this project (protip - don't pick a queen-sized bedspread for your first quilt!), I put it away and waited for a little while for another idea to come around. Late in 2008 I visited the fabric outlet down in Portland with my friends Julie and Lindsey, and I picked up the fabric for my first small project - three matching butterfly-print quilts, done as a simple 8x8 arrangement of 6" square blocks, for my mother, my sister, and myself. I finished one in April 2009 for my sister's birthday, one in May 2009 for Mother's Day, and finished mine in December 2009 just in time to take with me to Phoenix on a flyball road trip. Next I made a baby quilt for little baby Finley, which was described in an earlier post, and that's the quilt where I really started outgrowing the capabilities of my sewing machine...and so the trouble started.

The sewing machine I had been working on was actually one that Chris received as a Christmas present in 1998 or so, a Janome L-108 machine which was pretty simple but did its job well for various small projects through college. It's shown in the photo to the left, taken after I rearranged the music/craft room into a sewing room earlier this year. The problems that I started having with it were fabric travel and inaccurate piecing, namely having difficulty doing accurate seam allowances which is critical for doing any complicated quilt work. So I kept working on the baby quilt, while beginning to look up information on what sewing machines were available these days. The answer to that question is a LOT, with many different brands to choose from and price points from $100 up to $10,000 depending on what features and brand you go with! I ended up trying out several different machines with an eye to finding one that I liked for quilting specifically, and ended up purchasing a Janome MemoryCraft 6600P on the weekend of my birthday this year. However, that was just the start of my journey...and this machine will get its very own post later, mainly because I don't have any pictures of it online!

Around the time that I was getting ready to buy the MC6600P, I noticed a post on my local Freecycle for a "Pfaff sewing machine in cabinet" that was available for pickup (free, as per the group rules). It turned out to be just a few blocks from our house, we had Truck Norris, so I convinced Chris to take me to pick it up. It turned out to be a 1951 Pfaff 130 (one of the first zig-zag sewing machines), which is quite popular with many groups including sailors, outdoorsy folk, and dog folk, as it easily handles sailcloth, webbing, and other difficult and thick fabrics. The lady who gave it to me told me it belonged to her grandmother, and that she hadn't used it in years since obtaining it. The drawers were full of items, including accessories, very old spare parts (the extra belt for the sewing machine was listed as $0.75!), and the manual and original warranty card (marked June 1951). We got it home and I figured out how to plug it in and use it, which took a bit since I'd never seen a knee pedal before, and to my great surprise the machine worked! It wasn't smooth and the wiring was downright frightening, but it did in fact work despite the ten years or so of neglect before I brought it home. The cabinet also badly needed a refinish, although it was very solid and structurally sound, and I wanted to change the knee pedal to a foot pedal.

The photo to the right was taken after I refinished the cabinet (an adventure all on its own!) and had the machine refurbished slightly (it needed a new motor, a foot pedal, and a tuneup). I even painted the insides of the drawers a bright purple, and replaced the ugly drawer pulls with some pretty copper-colored ones from Lowes. The adventure of refinishing the cabinet could fill up a whole post on its own, however! The machine is working, although it's been giving me some fits with what I want to do right now (sew webbing to make leashes and e-pen straps), and I need to take some more time with it to figure out what's wrong and fix it. I really like using it, it sounds very nice, and it's awesome to have a machine actually sunk into a cabinet and at the right height for me to use for sewing.

Just a few weeks later, I was perusing craigslist for the heck of it and found another interesting machine very inexpensively at a secondhand store near my house. I was largely interested for the case it came in, as that seemed like it would also fit the Pfaff so I could take that places if I wanted to, so I went to take a look. It turned out to be an unused (still partially in styrofoam) 1997 Singer NL-15, which is a reproduction model of a 15-91 from the early 1900s, so while it has the same look and similar (albeit slightly more garish) decals as those early models, it's very recently made and probably not the best quality. It is a straight stitch only machine, and it does that job reasonably well - I took it with me on our vacation to Cannon Beach and used it to make a crate cover for Phoebe's new crate. There's definitely nothing wrong with it, although I can see where it's not as precise as the Pfaff or either of my Janomes, and so I wouldn't want to use it for anything critical or complicated. However, it is a machine that can also be very easily converted to a hand-crank or treadle model, so between that and the shiny pretty decals I decided to keep it. Right now it's living on top of my storage cabinet in the sewing room, where the lovely decals are visible for all to see.

Wow, this post is already longer than I expected! Stay tuned for Part Two, which will cover my quality Singer machines!