Tuesday, November 9, 2010

quilting projects this year

So far this year I have been working on two quilts, in addition to a few smaller sewing projects, both to improve my sewing skills and to have fun and make nice things for people I care about. The first project that I did this year was a baby quilt for my friend Deborah, whose daughter Finley was born in late April. The baby's room was going to be done up primarily in greens, so I chose a palette of green, brown, and yellow to make a quilt with mixed blocks. Most baby blankets are 40" x 60" in size, so I decided to use 6" finished squares along with 1 4" x 6" finished rectangle per row, for a total of 10 rows of 7 pieces each. I picked out lots of fun fabrics, cut lots of squares (I have enough left over for another quilt of this style!), and then laid them out on my bed to find a pleasing arrangement. I then put the squares together into the 7-unit strips, then put the strips together to finalize the quilt top. The first backing that I chose was too light for the finished quilt (it was white with mint-green stripes), so I found a second fabric that was a nice dark green with white polka dots. I quilted the blanket using a feather stitch in diagonal rows with variegated green/yellow thread, which came out looking very lovely. Finally I used a gorgeous sage-green leaf print to put the binding on, and that was hand-sewn to the backing using the blind stitch that my friend Christy taught me. I finished off the blanket with a small tag noting the date and my name, and it was all done. I really like how it turned out, the weight is very nice and with the cotton on one side and the flannel on the other there are two options for how to use it for snuggling. It also turned out to be the perfect size for the bottom of the Pack-n-Play once folded in half, which is awesome and means I'll use that size for any future baby quilts that I make. Here's a picture of Ben holding up the finished quilt at the baby shower (both the above photo and this one are taken from Deborah's pictures on her blog).


The next quilt that I am still working on is a pattern from the book Quilter's Academy: Volume 1 Freshman Year which I am finding to be a great resource for basic quiltmaking techniques. While I don't quite agree with all that the authors talk about, I very much like how they've put together a skill-building course that involves making parts of a sampler and has at least 2 projects per skillset. The pattern I'm using is a modified log cabin that also uses character fabric panels, and since I am making it for my husband I chose a coffee theme with a touch of dog theme fabric. Once I chose the main fabric (the pattern for the panels, as well as coffee-cup fabric for the outer border), the color palette was set as blues and browns so I picked the other fabric to match. The inner border has flecks of red, and I found a beautiful red fabric with coffee beans on it too, which will be used for the binding.

It took me quite a while to make up the quilt top (shown with Chris holding it up at left), as the piecing was more complicated than simple blocks and I really wanted to take my time and make sure it came out well. I finally got the entire top finished in August, and then moved on to working on the backing and planning out my quilting pattern. I found a lovely blue swirl fabric for the backing, and even with cutting the outer border to follow the fabric directional design I had enough of that to put a stripe onto the backing to match. Since I had to piece the backing anyway due to the width of the quilt, I took the opportunity to put the coffee-cup fabric in as well, with the stripe offset from the middle up towards the top of the quilt (see picture to the right). It took using the ping-pong table in the basement and more safety pins than I expected to put this quilt sandwich together, I'll need more pins if I do quilts this big again! I've completed the quilting on the main part of the quilt, which I did using a large X across the pieced portion which was echoed by V shapes at a set spacing out to the inner border. That was done in blue thread, and finished by a stitch-in-the-ditch around the inside of the inner border also in blue thread. I'm still debating how to quilt the outer border but hope to decide and do that this week, and that quilting will be done in red thread. Once that's done then I just have to cut/make the binding and put it on, and the rest is just the handsewing to finish the binding and it's done! I hope to have it completed before we go to New Jersey for the Christmas holiday this year, so that we can take it with us on the plane.

I haven't done any sewing since before my trip to Can-Am, and I really wanted to play with a charm pack of Halloween fabric that I picked up when I got the backing fabric for Chris' quilt in August, so last night I made the pieced back of a small table runner using a "recipe" I got from the Moda Bakeshop blog. These fabrics just make me happy, it's really silly, but I like them a lot and this little project is perfect to do quickly to show them off. Below is a closeup of the center panel of the backing, followed by a larger photo showing the entire piece (the perspective is off because I used my phone in the other orientation to take the shot!).


That's all for now - next post will be about the scary proliferation of sewing machines that has occurred in the last eight months!

Friday, November 5, 2010

are you still there?

Almost seven months since my last update. Ooops. What I really wish I had was a way to download all of the blog posts I design in my head directly to the blog, as I've written lots mentally and just don't manage to get them online!

So, what have we been doing since April?

Lots of flyball, for starters. Seven regional tournaments since April, one of which was our own tournament that we hosted in late May in Seattle. Jadzia is rapidly closing in on her FGDCh-50k title, with Phoebe right on her heels. It's entirely possible that they will title at the same tournament next spring, depending on how the point totals run over the next few events. Curzon is back racing full-time, and earned his FGDCh in late March and is already halfway to his FGDCh-40k, and is consistently running 4.5's in cleanup position with as much enthusiasm as he ever had in start. Ezri earned her FM in April and her FMX in July, just after her first anniversary of racing. She's continued to speed up, consistently running in the mid-high 3.9's in start position and pulling out a PB of 3.863 in August, followed by a 3.896 in October.

At the beginning of October, my friend Deborah and I drove to Indianapolis, IN taking my truck/trailer rig, her 5-month-old daughter, and four of our dogs (Ezri, Curzon, Epic, and Indigo) in order to attend the NAFA Can-Am Classic (aka NAFA Flyball Nationals). We ran two teams combined with Canine Mutiny, the club Deborah ran with while she interned in Boston for a year, moving the red girls over to their club to race Regular and entering a JCJ team in Open with one of their height dogs. Deborah's husband Ben flew in for the weekend to run Epic and help with the baby, and my mother drove over from Virginia to see me, see her granddogs race, and also help us out with the baby. There's a ton to talk about from this event, and even more pictures, so I'll save the rest of it for its own blog post.

August brought us the annual nerdfest known as PAX (the Penny Arcade Expo), where Chris was an Enforcer for the third year and I took part in BYOC (bring your own computer) for the third time as well. This year we split the dogs amongst our kind friends and stayed in a hotel downtown for the weekend, which made the event much easier for both of us since there was no issue with how/when to get home to care for the critters. The event was a blast, I met some awesome people from Ars, and got to play a -ton- of games all weekend long. My favorites were getting to demo Portal 2 by actually playing it, finding a fun physical-puzzle game called Pajaggle, seeing the Penny Arcade D&D game live, and seeing Wil Wheaton's panel. I also took part in the Buttoneer exchange, which really made the event personal for me and also satisfied my dragonlike "must acquire shiny things" tendency nicely - I'm definitely going to do that again!

The events leading up to Portal 2 were probably the most entertaining, as I was lucky enough to be brought along with an Omeganaut as his "plus one" to enter the Expo Hall on Saturday morning before the regular crowd. We made a beeline for the Portal 2 exhibit, and were in the second group to go in for the day (and got t-shirts, yay!). I happened to be wearing my Portal t-shirt as well, which might have influenced what happened next. As we sat down in the theater, one of the booth people came up to me and we had the following conversation:

Booth Guy: Did you play Portal?
Me: Yep!
BG: Do you know how to use an Xbox controller?
Me: Yep!
BG: Do you want to help us demo Portal 2?
Me: OMG YES!!

So I got to play the second player during the co-op demonstration of the game! It was WAY fun, even moreso than Portal, because now there are two players with two portal guns, making all kinds of neat things possible. The game comes out around my birthday, and I know what I'll be playing that weekend!

I have also been sewing more, including taking an awesome class on how to maintain my Featherweight sewing machine(s) as well as further reorganizing my sewing room. I'm up to a total of six sewing machines now, which may alarm some people, but oddly enough they all have their uses. My fancy Janome MC6600P is my main machine, and I've been using it to work on a quilt that I'm making for Chris, partially shown in this photo. I've also picked up a Featherweight to use for going to classes, so now I really need to FIND some classes that will work with my schedule, and I used it to piece the borders on the quilt as well. I got a second one very inexpensively from Craigslist, that I will try to refurbish and if that fails I will use it for parts for the first one - they are 50-year-old machines, after all! I picked up a really pretty replica Singer with sphinx decals that I wound up taking on vacation, again inexpensive and while not as good as the Featherweights it is certainly lovely to look at. I finally refinished the cabinet and refurbished the Pfaff 130 that I picked up from Freecycle in February, and I'm trying to figure out how to make it work on some thick webbing in order to make various dog-related items. And of course, we still have the original Janome L-108 that Chris got for Christmas in 1998, as it's the only free-arm machine in the house should we need to hem or mend something!

That should be enough to get over the "oh I haven't posted in so long!" hump, so here's to another post next week! We're heading to Canada for a tournament this weekend, so no online access until late on Sunday.

Wednesday, April 21, 2010

another motorcycling milestone - 20,000 miles

Yesterday on my way home, on the express lanes just before the merge back to I-5 at Northgate to be precise, my bike turned over 20,000 miles. Obviously I have no way to take a picture while riding, so here is one I took this morning.


The last few months have been interesting, not least of which was due to the problems discovered with the bike in February. My ABS suddenly began having fits where it would turn off randomly, only turning back on after restarting the bike. Nothing in the users' manual provided any help, so I made an appointment to take the bike in to have them look at the computer. The morning I was to take the bike in, the auto-shutoff for my turn signals stopped working, which was even stranger. So I rolled into Ride West that afternoon, and the guys started looking at the bike to try and figure out what was wrong. A few minutes later one of the senior techs walked over, squinted at the bike, and then popped it up onto the center stand to show us what was wrong.

The back wheel had about 2" of play in it, meaning it was (a) knocking against the sensors that control the ABS and the turn signal shutoff and (b) in danger of falling off.

Needless to say, the bike stayed there that day and Chris had to come pick me up from the shop. They were able to order a new back wheel assembly, and this was easily covered under warranty so it did not cost me anything. However, they could not tell me how long the problem had occurred, just that it was probably gradual since I had not noticed a sudden change in how the bike handles.

When I got the bike back after the repair was complete, it was like night and day how it handled from when I dropped it off. Curves that I had been taking very slowly recently were now not a problem, turns no longer required hard braking, and the bike generally felt more stable. I had thought my slower curves/turns were simply due to a bit of lingering uneasiness from the getoff last July, but it turns out that I was unconsciously compensating for the changes in the bike's handling characteristics as the back wheel degraded over time. It's entirely possible that the wheel had started to degrade as far back as July, which means that while it was not the cause of my getoff on those steel plates, it is entirely possible that the reduced handling contributed to the accident. I'll never know for sure, unfortunately, but now I'm being extra paranoid about paying attention to the bike and how it's performing each and every time I ride it.

Now if I could just pop it up onto the center stand myself to check on it from time to time...unfortunately, that is simply beyond my abilities. I suppose that's why I have a husband!

Monday, April 19, 2010

scones!

I think I have mastered scones now.


That is a fresh-out-of-the-oven chocolate chip scone made with Ghiradelli milk chocolate chips. YUM. The recipe that I've written down below is from my friend Christy, but the comments and how I got them to work best in my kitchen are all from me.

Tasty Sugar/Cream Scones
2 3/4 - 3 cups all-purpose flour (I use King Arthur flour)
3 TB sugar1 TB baking powder
1/2 tsp salt
5 TB cold unsalted butter
1 cup heavy cream
~1/2 cup mix-in (chocolate chips, dried fruit, etc.)

This is way easier to do if you have a stand mixer and a clean surface for kneading. I've found that the beater blade attachment I bought for my Kitchenaid a while back works the best for getting the butter worked into the dry ingredients.

1. Put dry ingredients into mixer. I've found that I need a little less than the 3 cups of flour called for in the original recipe, so I've been going with about 2 3/4 cups and adding in extra if I need it. Mix up the dry ingredients a bit, then turn off mixer.2. Cut up cold butter straight out of the fridge, touching it as little as possible. If you're using a stick of butter, the trick Christy taught me is to cut it into 1/4" slices, then stand the stack up on end and cut the whole stack into quarters. Turn on the mixer (low speed) and add the butter a chunk at a time. Let mixer run a bit more until you get the "crumbly cornmeal" kind of look to the butter/dry mixture.
3. Add your mix-ins if you want to at this point. I'm using about a quarter-bag of chocolate chips per batch and that's coming out really nicely.
4. Get a spatula ready, measure your heavy cream, and pour it into the mixer while it is running. Quickly use the spatula to get the rest of the cream out of the measuring cup, as the mixer isn't going to run for very long once the cream gets incorporated. Stop mixer when it starts to complain, which will be soon.
5. Take the blade/whisk out of the mixer bowl and knock the dough off of it and back into the bowl. Knead the dough in the bowl as much as you can to get any remaining dry ingredients incorporated, then pull it out and knead it a bit more on the clean surface you have ready. Overall kneading needs to be minimized, especially if you don't have time to chill the scones before baking, but you also need to get dough evenly kneaded, so it's a balance.
6. When the kneading is done, shape the scones for baking. I have been happy with making a large round wedge about 3" thick, then cutting it into eighths with a knife. Once you've got your scone shapes, chill them for at least 2 hours and up to several days (if covered with wrap or in tupperware). This is important so that the butter in the scones won't melt before the baking takes place, as that causes collapsed and funky scones (they taste OK though).
7. Preheat oven to 425 degrees. I'm happiest using a baking stone, and that works best if the stone is also preheated to 425 before use. If I put the scones to be baked onto parchment paper, then I can leave the stone in place and just open the door and pop the paper onto the stone. Bake scones until light brown - I've found that 12 minutes gets me just a bit of browning while baking all the way through.

One batch makes 8 palm-size scones, unless you eat too much of the dough before you bake them. Which is understandable, as it's essentially cream/butter/sugar and it's TASTY. So here are the scones before baking:


And after baking is complete:


Super yummy! :D I am especially fond of hot chocolate chip scones eaten while the chips are still melty, that's what I've been having for dessert most nights for the last two weeks. The scones are easy to make and are done in about 15 minutes, and the hardest part is cutting up the butter into small pieces.

So now I've mastered bread and scones. Now if I could just master gluten-free versions of both, we'd be all set. Sadly my one attempt at GF scones was only good immediately out of the oven, they were not good once they cooled down. We'll see if I get brave enough to try again!

Monday, April 12, 2010

flyball weekend in Canada!

This past weekend was the third of our "Spring Series" of five tournaments in seven weeks, and was again up in Cloverdale, BC. This was also our third outing with our new trailer, and I think we're starting to get the hang of it. Of course, we had to make our lives more challenging by taking another two dogs with us - nothing is ever easy, after all!

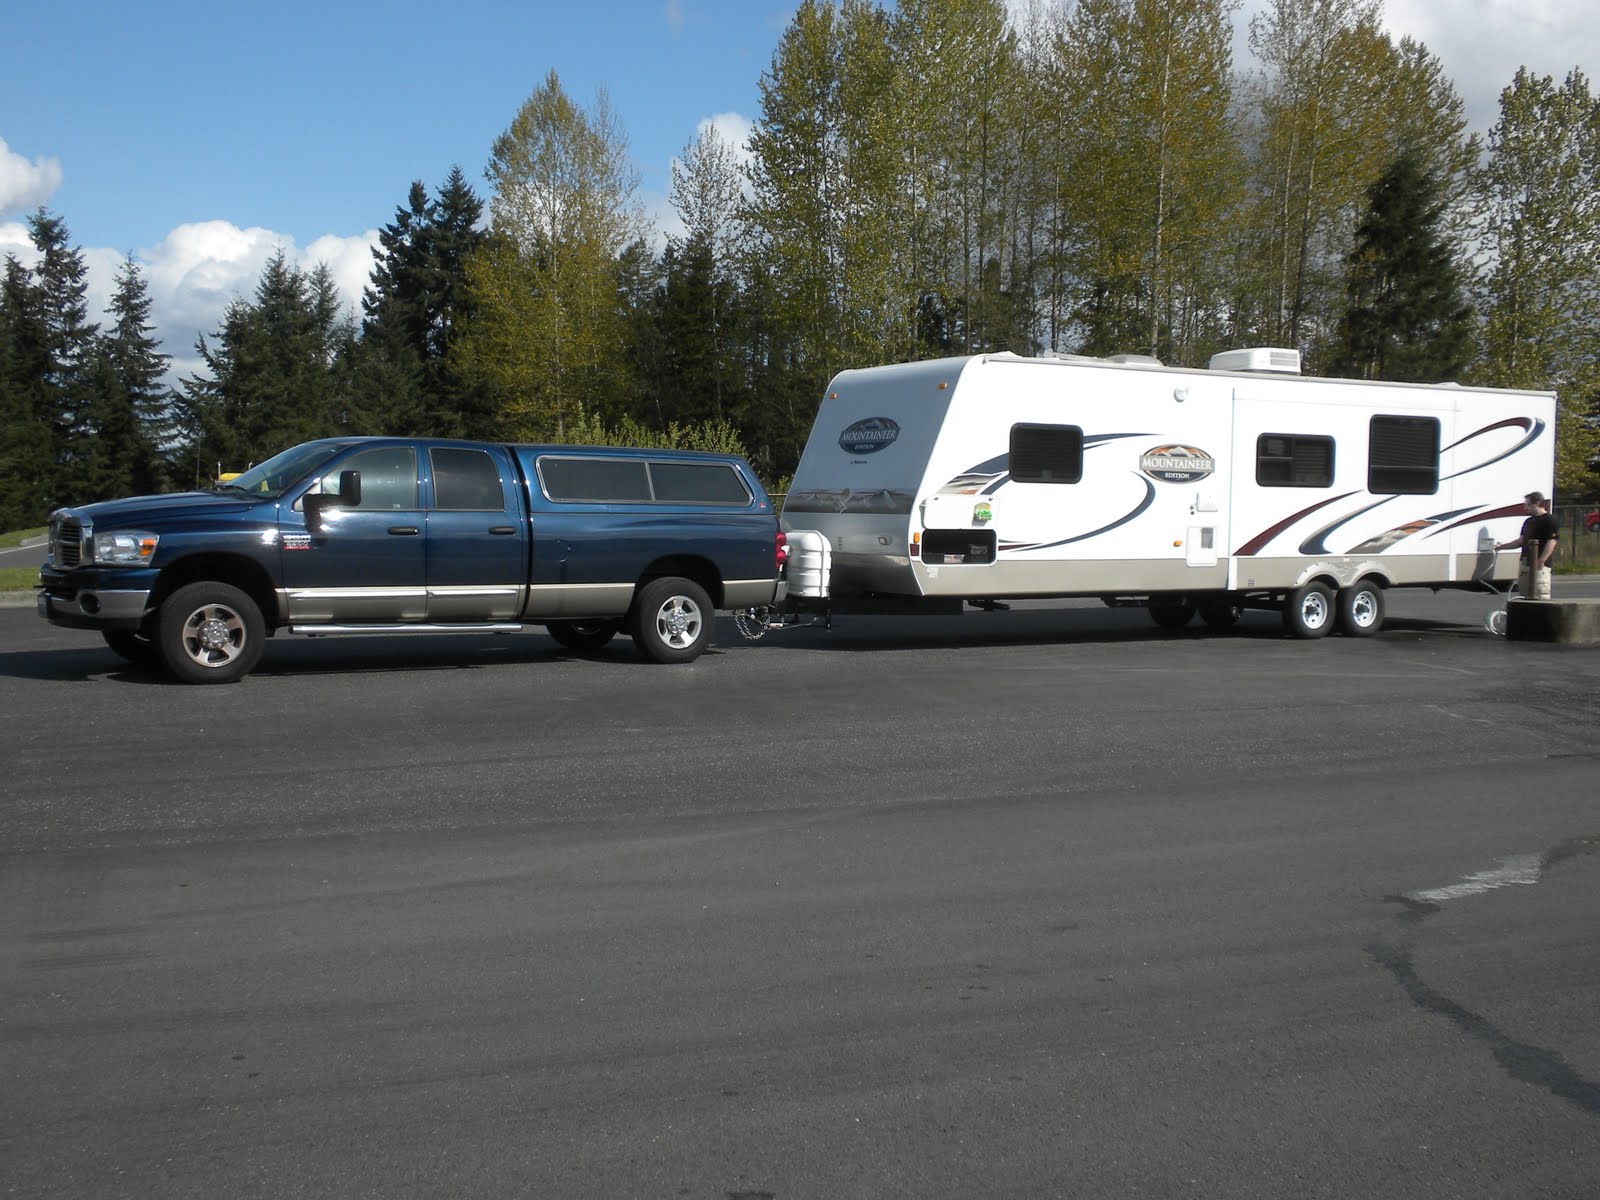
This is Truck Norris, hauling our trailer, as we are stopped to fill up our water tanks at the Smokey Point rest stop on our way north to Canada. Notice Chris standing near the back of the trailer, a great reference point for the scale of it!

Six dogs fit nicely enough in the backseat of the truck, although there were some creative sleeping arrangements. Here you can see Ezri sleeping on Phoebe sleeping on Indigo, with Epic sitting up in the center and looking out the window.

Epic is a bit of a baby, plus he needs his feet wrapped before very race. Luckily the former tendency makes the latter requirement much easier to deal with - he thinks it's great to be flipped over and petted, even if it involves his feet being wrapped!

And of course, on our way home we had to hit the dump station...if we ever all caravan together, it'll take a lot longer since there's only three dump ports!

It was quite a successful weekend...Ezri earned her Flyball Master title, and Phoebe became our club's second Flyball Grand Champion 40k. There were four more titles earned within the group that went, including both Indigo (Flyball Master Champion) and Epic (Flyball Dog Champion Gold) who traveled with me. Now, if we could just have some warm weather to go with the dry sunshine we enjoyed last weekend.....

Tuesday, March 16, 2010

trailer time for flyball

At last we will be using Truck Norris to his full potential - we are picking up our new RV travel trailer on Friday! We have purchased a 2009 Montana Mountaineer 32PRD from TacomaRV, and we can't wait to go to the UFLI tournament this weekend for its maiden voyage. The trailer is quite spacious and is the best floorplan we've seen for our needs, with a separate bedroom, reasonable-sized bathroom, nice living area, and a separate bunkroom with couch and door that will be the dog room. It's a nicer trailer than we originally were planning on purchasing, with a larger hot-water heater and tanks as well as nicer finishings, but due to it being on closeout we were well within our budget and we're thrilled to pieces. Pictures will be posted next week!

This weekend also marks the beginning of our spring flyball tournament season, which in no small part influenced our decision to buy the RV last week. We have five tournaments in the next seven weeks, with most of them being up in Canada with just one down in Oregon. This schedule should provide a great break-in period for the new rig, and we can't wait!

Onwards!

Wednesday, February 24, 2010

three months! where did winter go?

My last post was on November 30th, and it is now February 24th. It's amazing how time flies when I'm not looking, especially with so many activities filling up our lives. So, a quick sum-up of the past few months, which will hopefully be embellished with photo posts this weekend.

Christmas was lovely, if quiet with just the two of us and Chris working the holiday. We had a great Christmas Eve with friends filled with Rock Band and a tasty dinner from PSC, followed by a morning of video skype with family while opening presents. Just three days later I took Ezri, Jadzia, and Phoebe to go on the JCJ trip to Phoenix AZ for the Wags to Wishes tournament on January 1, 2, 3. The trip was great, if very long on both sides, and it was glorious to leave the cold and rainy Pacific Northwest for a few days in the sunny 70-degree desert. Ezri got to try herding sheep again and earned her HIC, and Phoebe got to try out barn dog several times and ended up tied for first over the weekend with 8 rat finds in just 5 minutes. All three girls ran very well in the tournament, and we set a new club record of 17.82 seconds with a lineup of Ezri / Indigo / Riker / Epic.

My bike has kicked over 18,000 miles, and just two weeks ago we found that the back wheel bearings had gone bad, causing wobble in the wheel and deactivating the ABS and auto-off on the turn signals, which is what led me to take it in to the shop. The degeneration was likely very slow, hence why I didn't realize it was a problem as I kept compensating for the limitations of the bike, but once it was fixed the difference was definitely huge. I'm definitely lucky as it's entirely possible the back wheel could have come off, with obviously bad consequences. All is well now, and I'm now paying much more attention to any change in the bike's handling, no matter how small - I definitely don't want to repeat this experience!!

I've continued to work on my quilting, finishing the third of the three matching butterfly quilts in December before I left for Phoenix, and starting my next project the same week. I've definitely outgrown our original sewing machine (a Janome New Home that Chris received as a gift for Christmas 1997 or 1998), and after several weeks of searching, tryouts, and reading reviews, I purchased a brand new Janome MemoryCraft 6600 from a quilt shop in Duvall. In order to learn all I can about using my new machine as well as improve my quilting techniques, I'm now working through a quilt instruction book including basic techniques, building a sampler quilt top, and doing projects that use each technique as it is taught. Right now I'm learning strip piecing, and will be making Chris a brown-and-blue coffee-themed lap quilt with the first project pattern. Amusingly enough, I've also picked up a third sewing machine - this one given away for free on Freecycle, that turned out to be a 1951 Pfaff 130 still with the original added electrical motor, plenty of extras, and housed inside the original wired cherry cabinet with knee control. Amazingly, it still works just fine after all this time (including at least 10 years in a garage), and had no issues sewing a test piece with all of its different stitches, although there was a slight smell of burning from the aged wiring. I'm planning to take the machine in to have it looked over, have the wiring upgraded to modern standards, and have it updated to have its own power cord and foot control so that it can be used outside of its cabinet. I'm also going to use the cabinet as a project to learn how to refinish wood, as it's pretty nice and just needs a good sanding and new finish to look even more lovely. My research has indicated that this type of machine will go just about forever, and is quite good at doing heavier projects such as light leather, sailcloth, and nylon webbing, so I plan to see if I can make dog collars with it once it's in full working order.

This weekend is the sewing expo in Puyallup, and I'll be going on Friday with Christy, Lindsey, and Julie - I'm definitely looking forward to it!