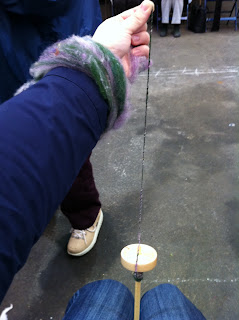
One of the classes I took at the Sewing Expo last weekend was a beginner's hand spinning class using drop spindles taught by Morgaine Wilder of Carolina Homespun. I have been somewhat intrigued by the concept of spinning for a while, and it was recently brought back to mind when I re-read The Mists of Avalon as the women's work of spinning, weaving, and embroidery is a constant theme throughout the story. So I signed up to take this class, and I had a very good time and really enjoyed Morgaine's teaching and the opportunity to learn how to do this once-common and basic skill.
I'm not going to attempt to explain or teach the basics of spinning in this blog post, as I certainly don't have the experience or credentials to do so. I do have a ton of pictures of my learning process during class, however, so here we go.
The first drop spindle I picked out of the box and the first piece of roving, before we did pre-drafting work on the roving to begin the spinning process. Unfortunately I was too rough with this one when trying to spin a leader and the hook on top of the shaft pulled out, so I had to change spindles shortly into class.
Leader successfully spun and additional spinning of the yarn is underway.
Spin and park method - after putting twist onto the yarn with the spindle, I put the spindle between my knees to hold it steady while I draft out more fleece and allow it to spin into yarn.
First batch of a yarn single complete!
First batch of yarn single off the spindle and wound into a ball. The next piece of roving to be spun is in my lap next to the now-empty spindle.
More yarn is made from the second piece of roving! Morgain also gave us samples of three different other fibers (although of course I cannot remember what they are now) to try and spin at home. Two of them are purple, yay!
Two spinning singles complete, off the spindle, and wound into balls. The next step is to ply the singles together (in the opposite direction that they were spun) in order to make a two-ply yarn.
Plying the singles into yarn - it was hard to keep those tiny (and uneven!) balls of yarn from flying off my lap and onto the floor! I see why so much additional equipment can be helpful for something as simple and portable as spinning is supposed to be.
Completed two-ply handspun yarn, on the spindle. I haven't taken it off the spindle yet, but the next step is to skein it (not wind into a ball) and then very gently wash/wet it so that the wool fibers "wake up" a little and nest together. This is supposed to smooth out the plies and make the yarn look a lot better, although with my very amateur first attempt I don't know how much it will improve!
I had a lot of fun at the class, and ended up buying another spindle (ooooh purpleheart wood) and some additional fiber and other bits and bobs from the Carolina Homespun booth at the expo. I've spun up the rest of the main fiber we used in class, and am planning to work on the other samples next and see if I can get more consistent yarn and possibly thinner yarn as well. This is a physical skill more than it is a mental one, it's all about training my hands to do what I want them to do, and I like that a lot. Yay for learning new things!
Here is a 5-week post-surgery photo of Curzon. He's continuing to be awesome, with full health and activity levels as he bounds across the house and plays tug with anyone who will come near him. Apart from a slight wrinkle in his skin, the scar is almost invisible now, and it will only become moreso as his fur continues to grow in. That's my boy!
And last but not least, here is some of the pretty fabric that I bought at the expo all cut up using my Accuquilt Go! cutter into 3.5" tumblers. The sparkly and marbled fabrics are all hand-designed, and the batik fabric was just pretty and in the right colors. I'm planning to make a tumbler quilt for myself using a wide variety of purples and dark blues, including some of these special fabrics that I like so much.


No comments:
Post a Comment